Friday, August 7, 2015

Add dummy data to a cube or muddle data to make it unintelligible

In continuation from my last post  – Creating a large dimension, this post will describe how we obfuscated data in an existing cube.  The premises on which these 2 processes were built, was to mimic the most voluminous cube for support; then reproduce the myriad of issues that accompanied this cube (be it in TM1, Cognos BI or Cognos Insight).

Goal is to obfuscate the numbers, and modeled on Dilbert’s logic :)


To illustrate, I have built a sample cube with few dimensions.  Time dimension has months from Jan 2014 through Dec 2014.  There is Chart of Accounts as well as dimension with Regions (picked from Planning Sample database).  Also there is a dimension called “aLargeDim” – this is the one with close to half a million elements in it.  For the purpose of demonstration I have created it with 1,000 elements in it.

Turbo Integrator (TI) process we have consists of code in Prolog, Data and Epilog tabs.  The original process I had, is slightly modified to add dummy data to the cube.  Since I cannot attach files in WordPress, I will explain it with snippets of code.  Please note that I have only shown snippets of code.  It will serve you as a template to build on it.

Parameters


You’d need to specify the cube name and option 1 (to add dummy data) or 2 (muddle data to make it unintelligible).  The last 2 parameters are required, if you are adding new data.  It controls the volume of data being added (defined in percent) and on what dimension you’d like to control.

Prolog

Some housekeeping steps like disabling the logging on cube is not shown.  Bulk of the code in Prolog is made up of the while loop.
  • If we are adding data, then we are calculating the number of intersections in the cube (highlighted in maroon color)
  • If we are adding data, then pick only percentage of members from the dimension mentioned in the parameter name (highlighted in green color). Say there are 1,000 elements in it and pi_PercentPopulate is 20, then the code will pick every 5th element (100/20 = 5) … there by totaling the number of that dimension elements to 200 (20% of 1000 = 200)
  • If we are adding new data, then we need to pick cells in a view that are zero (skip zeroes set = 0)
  • If we are making existing data unintelligible, then we need to pick only the non-zero value (skip zeroes set = 1)
vi_CellCount = 1;
vi_AddCount = 0;

i = 1;
vs_DimName = TabDim (vs_CubeName, i);
WHILE (vs_DimName @<> ”);
    # Calculate the total cell count.  This is required when we need to populate a % of cells
    vi_DimSiz = DimSiz (vs_DimName);
    vi_ElemCnt = 0;
    IF (pi_AddData = 1);
        WHILE (vi_DimSiz > 0);
            IF (ElLev (vs_DimName, DimNm (vs_DimName, vi_DimSiz)) = 0 );
                vi_ElemCnt = vi_ElemCnt + 1;
            ENDIF;
            vi_DimSiz = vi_DimSiz – 1;
        END;
        vi_CellCount = vi_CellCount * vi_ElemCnt;
    ENDIF;
IF (SubsetExists (vs_DimName, vs_SubName) <> 0 );
SubsetDeleteAllElements (vs_DimName, vs_SubName);
ELSE;
SubsetCreate (vs_DimName, vs_SubName);
ENDIF;
    IF (Upper (ps_DimName) @= Upper (vs_DimName) & pi_AddData = 1);
        # If the dimension name matches to the prompt value, then pick only % of its elements
        # Ex: if pi_PerCentPopulate = 20, then pick 20% of elements from this dimension
        vi_DimSiz = DimSiz (vs_DimName);
        vi_ModCount = Round (100 \ pi_PercentPopulate);
        vi_SubInsPt = 1;
        WHILE (vi_DimSiz > 0);
            IF (ElLev (vs_DimName, DimNm (vs_DimName, vi_DimSiz)) = 0 & Mod (vi_DimSiz, vi_ModCount) = 0);
                SubsetElementInsert (vs_DimName, vs_SubName, DimNm (vs_DimName, vi_DimSiz), vi_SubInsPt);
                vi_SubInsPt = vi_SubInsPt + 1;
            ENDIF;
            vi_DimSiz = vi_DimSiz – 1;
        END;
    ELSE;
        # Otherise use all the elements in the dimension
        SubsetIsAllSet (vs_DimName, vs_SubName, 1);
    ENDIF;
    ViewSubsetAssign(vs_CubeName, vs_ViewName, vs_DimName, vs_SubName);
    i = i + 1;
    vs_DimName = TabDim (vs_CubeName, i);
END;
vi_NumOfDims = i – 1;
# If we are adding data and ps_DimName is not a valid one, then quit
# Otherwise we will end up processing 100% of intersections
IF (pi_AddData = 1 & vi_SubInsPt <= 1);
ProcessQuit;
ENDIF;
IF (pi_AddData = 1);
    # If we are adding data, then we need to conisder the blank cells
    ViewExtractSkipZeroesSet     (vs_CubeName, vs_ViewName, 0);
ELSEIF (pi_AddData = 2);
    # If we are modifying data, then we ned to modify only the non-zero cells
    ViewExtractSkipZeroesSet     (vs_CubeName, vs_ViewName, 1);
ENDIF;

Data Tab

In the data tab, we call a random value and then multiply it with the existing data (if required).  The underlined piece feel free to change it whatever you want.

vi_RandVal = Rand ();
IF (pi_AddData = 1);
# Skip every so often
vi_Populate = IF (vi_RandVal < 0.33333, 0, 1);
IF (vi_Populate = 0 );
ItemSkip;
ENDIF;

IF (vi_AddCount > (pi_PercentPopulate * vi_CellCount \ 100));
ProcessBreak;
ENDIF;
ENDIF;

vi_Sec = StringToNumber (TimSt (Now (), ‘\s’) );
vi_NewVal = (NValue + (100 * vi_Sec) ) * 0.75 * vi_RandVal ;
vi_AddCount = vi_AddCount + 1;

IF (vi_NumOfDims = 2);
CellIncrementN (vi_NewVal, ps_CubeName, Dim_001, Dim_002);
ELSEIF (vi_NumOfDims = 3);
CellIncrementN (vi_NewVal, ps_CubeName, Dim_001, Dim_002, Dim_003);
ELSEIF (vi_NumOfDims = 4);
CellIncrementN (vi_NewVal, ps_CubeName, Dim_001, Dim_002, Dim_003, Dim_004);
ELSEIF (vi_NumOfDims = 5);
CellIncrementN (vi_NewVal, ps_CubeName, Dim_001, Dim_002, Dim_003, Dim_004, Dim_005);
… R E P E A T    T H E   B L O C K     F O R    A S    M A N Y     D I M E N S I O N S    Y O U    H A V E

Epilog tab has not much code in it, except to turn the logging on the cube, back to initial value.

Demonstration


Ok, not literally … but for those, who insist on seeing accurate numbers (to the decimal) it may lead to confusion :)

I have entered some predefined values in ‘Sales’ account for Jan 2014. This is what the data looks like. Nice, round numbers are present. We will run the code with option 2 for pi_AddData parameter.
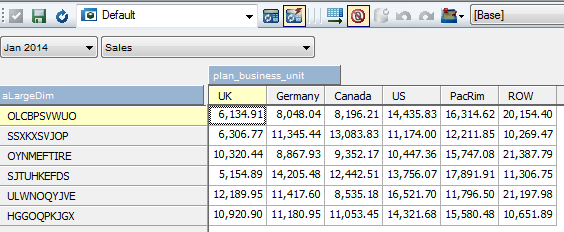

 
This is the output after running the process.  Process runs fairly fast, as we have to work with <100 rows.  As you can see the numbers are distorted.


Let’s clear the data in the cube and re-run the process with pi_AddData = 1 and populate about 5% of cells.  The output will look something like this – shown for couple of accounts for Jan 2014.  Data however is spread across all the months and accounts.


References:

Happy Data Manipulation to you!

Monday, July 27, 2015

Create a very large dimension in Cognos TM1 using Turbo Integrator (TI)

There are instances during an implementation where in, there is a need to export out one or more cubes for Support.  However, client has reservation against data being taken out from their premises despite:
  • Having signed an NDA (Non Disclosure Agreement)
  • Erasing out original data and loading arbitrary data
Recently we ran into such situation.  Over the course of this and the next post, I will cover steps that we took to simulate the cube for Support.


The cube that we wanted to replicate had bunch of dimensions, that we could easily mimic – like Time, Chart of Accounts, Region, Type, Indicators etc.  However, for a one particular dimension it was a daunting task to mimic (at least manually).  It has about 500,000 elements in it.  The number of elements in it, continues to grow month-on-month basis, with a potential of adding roughly couple of thousand elements each month.

Besides being THE largest dimension in our model, entire implementation revolved around it.  Hence it was critical to have it mimicked and also load arbitrary data in couple of cubes using this dimension.

The TI process code is pasted below.  It accepts few parameters, the description is mentioned as well.  We’d need to enter the dimension size (number of leaf level elements), length of each element, whether they are numeric/text/alphanumeric and lastly the dimension name.


 This code relies heavily on the random number generation to determine the numbers/characters that go into the element.  So it natural to encounter is the repetition of random numbers in TM1 after 65,536 times.  Check out my previous post on this!

Here we are attempting to create half a million random elements which are made up of only text characters.  As you increase the number to a million or two, there is possibility of elements that are formed are repeated (since random numbers in TM1 start repeating).  In such instances, attempts to create elements upto the parameter specified may run into an infinite loop.  To avoid the possibility running the code forever, I am breaking the execution, if the attempt to create an element goes above 10K the dimension size. 

Turbo Integrator (TI) Code consists of only the prolog tab and here is the actual code:

vi_Siz = IF (pi_Siz = 0, 10000, pi_Siz);
vi_Len = IF (pi_Len = 0, 10, pi_Len);
vs_DimName = ps_Name;
vi_Attempt = 0;
vi_MaxHit  = 0;
vi_MulFac  = 1;
IF (DimensionExists (vs_DimName) > 0);
    # Either destroy the dimension or stop execution, based on your preference
    DimensionDeleteAllElements (vs_DimName);
ELSE;
    DimensionCreate (vs_DimName);
ENDIF;
WHILE (vi_Siz > 0);
    vs_Elem = ”;
    vi_Ctr = 1;
    WHILE (vi_Ctr <= vi_Len);
        # TM1 starts repeating random numbers after 65,536 times.  Hence use a multiplication factor to change the random value
        IF (vi_MaxHit = 64500);
            # This is where you can play around and alter way random numbers are generated
            vi_MulFac = vi_MulFac + Rand() * 2 + Rand ();
            vi_MaxHit = 0;
        ENDIF;
        vi_RandVal = Rand() * vi_MulFac;
        # If dimension elems are only numeric or alpha numeric with 50% of probablity, enter this block
        IF (pi_AlphaNumeric = 1 % (pi_AlphaNumeric = 3 & vi_RandVal < 0.5));
            vi_RandMod = Round (Mod (vi_RandVal * 10, (vi_Len -1)));
            vs_NewLetter = NumberToString (vi_RandMod);
        # If dimension elems are only string or alpha numeric with the other 50% of probablity, enter this block
        ELSEIF (pi_AlphaNumeric = 2 % (pi_AlphaNumeric = 3 & Rand() >= 0.5));
            vi_RandMod = Round (Mod (vi_RandVal * 100, 25));
            vs_NewLetter = Char (65 + vi_RandMod);
        ENDIF;
        vi_Ctr = vi_Ctr + 1;
        vs_Elem = IF (vi_RandVal < 0.5, vs_Elem | vs_NewLetter, vs_NewLetter | vs_Elem);
        vi_MaxHit  = vi_MaxHit + 1;
    END;
    IF (DimIx (vs_DimName, vs_Elem) = 0);
        DimensionElementInsert (vs_DimName, ”, vs_Elem, ‘N’);
        vi_Siz = vi_Siz – 1;
    ENDIF;
    vi_Attempt = vi_Attempt + 1;

    # Stop the loop, if the number of times you have attempted to create elements is about 10,000 higher than the element count
    # You can increase/decrease the number to your preference
    IF (vi_Attempt > pi_Siz + 10000);
        vi_temp = vi_siz;
        vi_Siz = 0;
    ENDIF;
END;

AsciiOutput (GetProcessErrorFileDirectory | ‘sk.txt’, ‘Number of time executed ‘ | NumberToString (vi_Attempt) | ‘, ‘ | NumberToString (vi_temp));

The code an be modified to make the elements begin with a certain character(s) like ‘SKU_’, ‘CC’ etc.  This is what the properties window shows after the code is run and some sample elements.


Thursday, July 23, 2015

Write to tm1server.log file from Turbo Intergrator (TI) process in Cognos TM1


All TM1 developers often use the TI function AsciiOutput to write to a file.  Most circumstances that lead to using AsciiOutput function is during troubleshooting of a TI process.
 
When the process does not behave as expected, we put the contents of multiple variables in a file at various places in the code, in conjunction with ProcessQuit and troubleshoot an issue.

What if you ever wanted to write something to tm1server.log, say to troubleshoot an issue or to capture information of your TI events?

Option 1: Use AsciiOutput

One of the options we have, is to use AsciiOutput.  Pitfall with this approach is that you will loose all the entries in tm1server.log, prior to the execution of your TI process.  This is not a preferred method to do it anyway!  (Unless AsciiAppend functionality sees light of the day, which hasn’t happened in last few years)

AsciiOutput (GetProcessErrorFileDirectory | ‘tm1server.log’, ‘This is a sample message’);

Option 2: Use Custom script (VB or Java)

Secondly, you could write a custom VB or Java script that accepts string as parameter and you could call the script using ExecuteCommand.  The script can be written in such a way to append to the tm1server.log file.  One thing to bear in mind is that the string that gets appended to the file, has the same column format as the tm1server.log.  This way the messages are standardized and your message doesn’t stand out.

Option 3: Use Java extensions in TI

With the Java Extension support in TI, IBM provides you the capability of writing to the tm1server.log.  Here’s the link to the article, explaining you how to do it.

Option 4: Use the new TI function LogOutput

Please read this completely before trying it out.  With 10.2.2 there are new loggers available.  Among them is TM1.TILogOutput; this logger allows you to write messages directly to the tm1server.log file.
Let’s create a simple TI Process with following lines of code and execute it:

LogOutput (‘INFO’, ‘HELLO WORLD – INFORMATION’);
LogOutput (‘DEBUG’, ‘HELLO WORLD – DEBUG’);
LogOutput (‘ERROR’, ‘HELLO WORLD – ERROR’);

LogOutput (‘info’, ‘Hello World – Innformation’);
LogOutput (‘debug’, ‘Hello World – Debug’);
LogOutput (‘error’, ‘Hello World – Error’);

The output will look like this:

The 1st parameter of the LogOutput function expects the message level – Info, Debug or Error.  It is NOT case-sensitive.  As evidenced by the output, the lines are repeated in the tm1server.log.  The output is tempting for those with curious eyes.  The line for debug (2nd and 4th in the TI) is not printed out.  For the TI to print out debug messages in the log file, we’d need to enable the logger TM1.LogOutput in tm1s-log.properties file.

If you already have a tm1s-log.properties file, then all you need to do is add this line.  If you do not have this file, you can locate one in the directory of each sample TM1 database.

log4j.logger.TM1.TILogOutput=DEBUG
Now re-run your process.  The output will look like this.

Passing Remark on tm1s-log.properties file:

    • tm1s-log.properties file should be located in the same directory as that of TM1s.cfg file
    • To suspend the logging set the logger value to OFF (log4j.logger.TM1.TILogOutput=OFF)
Reference – TM1 Taking a Peek Under the Covers, and Learning how to Troubleshoot (Session #1169 @ IBM Vision 2015)
 

Thursday, July 16, 2015

How to order/sort data in cube view used as a data source in Turbo Integrator (TI)?

An IBM Cognos TM1 cube view can be used as data source in a Turbo Integrator (TI) process. When such a view is used as a data source in TI, there is no control offered on how the cell intersections appear for processing. The order in which they appear, is determined by dimension index in the cube, and the subsets assigned for these dimensions.

Sometimes there is a need to process the data in an ordered format (say work top down i.e. process the data in descending order). We will look at ways to accomplish this.
Irrespective of the approach we take, it involves 3 steps namely –
  1. Export the entire data
  2. Order the data
  3. Use the Ordered data as data source
I will not delve into #1 (Export the data) and #3 (Use the ordered data).  These are straight forward steps.  Let’s discuss #2 (Order the data).  Broadly there are couple of options:
  1. Perform it outside of TM1
  2. Use a workaround and do it within TM1

Order/Sort the data outside of TM1

In this method, we’d need to export the data to a table in a database.  Use ODBC as data source and write a query with ORDER BY clause to perform the operation we need, there by leveraging the power of SQL.
Alternately, we could export to a flat file and do the ordering using excel or a scripting language of your choice.  Later this file can be used as data source.

Use Work around technique and perform the ordering/sorting withing TM1

There is no predefined function/method available in TM1 which can accomplish the work.  Instead, we will be relying on MDX and a temporary dimension to get the work done.  When everything is done, it will produce a file that is ordered/sorted per users choice – ascending or descending.  At a high level we will perform these steps:
  1. We will need one process that will read the cube view (which needs to be sorted) as data source
    • In this process, create a temp dimension in prolog
    • In addition, create ‘S’ attributes equal to the number of dimensions in the cube; plus one ‘N’ type attribute
    • In Data tab, add elements to the dimension
    • For each string attribute, add the dimension values of the cube
    • In the numeric attribute put the NValue
    • In Epilog, create a subset on this dimension using MDX expression.  We will use MDX function ORDER to sort the dimension by it’s attribute (numeric attribute) and create a subset
  2. We will need 2nd process that will use the subset as the data source.  Since the subset is already ordered, looping through the elements in this subset is equivalent to ordering the data
    • In the Data tab, we will retrieve all the attribute of the element and put it in a file
To summarize
  • We are creating a dimension which has elements equal to number of cells we will be working with
  • Add attribute to each element in the dimension.  Each attribute corresponding to the element information that make up the intersection
  • Order the elements in the dimension by using MDX function ORDER
  • Use this ordered subset and export the attributes of the element to a flat file.  This is the data we want to work with
If the number of intersections is very high (to the tune of millions) then there is overhead in terms of creating a dimension with that many elements as well as ordering it using MDX.  It might be faster to perform it in a DB … YMMV

As of writing this post, I am NOT aware of any method to attach file in the blog.  So I will try explaining it with snippets of code and screenshots.  We will use Planning Sample server and work with cube plan_BudgetPlan


In the Prolog tab of the 1st process we will build a view with the context elements highlighted.  We will also create the attributes.  The number of string type attributes equal the number of dimensions in cube and in addition, a numeric attribute to hold the intersection value.  The process accepts a parameter of ps_TempDimName … this is the dimension we will be working with to push the data and sort its elements.  Code snippets are taken from a process, which accepts 3 parameters:
  • TempDimName (explained above)
  • Sort Order (1 for Ascending and 2 for Descending)
  • Cube Name (whose data we want ORDERed BY)
AttrDelete (ps_TempDimName, ‘CubeValue’);
AttrInsert (ps_TempDimName, ”, ‘CubeValue’, ‘N’);
i = 0;
WHILE (i < vi_NumOfDims);
vs_AttrName = ‘Attr_’ | NumberToString (vi_NumOfDims – i);
AttrDelete (ps_TempDimName, vs_AttrName);
AttrInsert (ps_TempDimName, ”, vs_AttrName, ‘S’);
i = i + 1;
END;
AttrDelete (ps_TempDimName, ‘Attr_0′);

Now head over to the Data tab.  In here, we will add elements to the dimension as well as populate the attributes.  For those of you raising the eyebrows and wondering “Shouldn’t element insert happen in Metadata?“.  Take a look at the code below and check the underlined piece.  That should clear the doubt.

vs_ElemName = ‘Elem_’ | NumberToString (vi_RowCnt);
DimensionElementInsertDirect (ps_TempDimName, ”, vs_ElemName, ‘N’);

i = 1;
WHILE ( i <= vi_NumOfDims );
vs_AttrName = ‘Attr_’ | NumberToString (i);
CellPutS ( Expand ( ‘%v’ | NumberToString (i) | ‘%’), vs_AttrCube, vs_ElemName, vs_AttrName);
i = i + 1;
END;
vi_RowCnt = vi_RowCnt + 1;
CellPutN (NValue, vs_AttrCube, vs_ElemName, ‘CubeValue’);
 Let’s move on to the Epilog tab.  Here we will build the MDX expression and create the subset order in ascending or descending manner.  As the last step call the 2nd process

IF (pi_SortOrder = 1);
    vs_OrderBy = ‘ASC';
ELSE;
    vs_OrderBy = ‘DESC';
ENDIF;

vs_MDX = ‘{‘ | ‘ORDER ( TM1SubsetAll ( [‘ | ps_TempDimName | ‘]) , [‘ | ps_TempDimName | ‘].[CubeValue], ‘ | vs_OrderBy | ‘)}';

vs_Sorted_SubName = ‘zSubsetOrdered_’ | ‘vs_OrderBy';
IF (SubsetExists (ps_TempDimName, vs_Sorted_SubName) <> 0);
SubsetDeleteAllElements (ps_TempDimName, vs_Sorted_SubName);
ELSE;
SubsetCreate (ps_TempDimName, vs_Sorted_SubName);
ENDIF;

SubsetMDXSet (ps_TempDimName, vs_Sorted_SubName, vs_MDX);

ExecuteProcess (‘SECOND_PROCESS_NAME’, ‘ps_SubName’, vs_Sorted_SubName, ‘ps_TempDimName’, ps_TempDimName, ‘pi_NumOfDims’, vi_NumOfDims);

Below is a screen grab showing the attribute cube.  This would be output of the 1st process.


The 2nd process is fairly simple.  It will use Dimension Subset as data source and it will assign the Temp Dim Name’s subset  we are working with, as the source.  The Data tab of the code is pretty small.  All it does is, loop through the S and N type attributes and AsciiOutput to a file
vs_OutputStr = ”;
i = 1;
WHILE (i <= vi_NumOfDims);
IF (i=1);
vs_OutputStr = vs_OutputStr | CellGetS (vs_CubeName, V1, ‘Attr_’ | NumberToString (i));
ELSE;
vs_OutputStr = vs_OutputStr | ‘, ‘ | CellGetS (vs_CubeName, V1, ‘Attr_’ | NumberToString (i));
ENDIF;
i = i + 1;
END;
vs_OutputStr = vs_OutputStr | ‘, ‘ | numberToString (CellGetN (vs_CubeName, V1, ‘CubeValue’));
AsciiOutput (vs_FileName, V1, vs_OutputStr);
The sample file output will look like this:


 Now that you have the flat file, you can use this as data source for your 3rd process and move forward.  Just remember to handle the temp dimension and the flat file, after you are done working.  They need to cleared out.

Monday, July 6, 2015

Cognos TM1 Rand() function - it is NOT quite random after all !

Let me start the post with a Dilbert cartoon on Random number generator :)


Ok, so we have Rand() function in Cognos TM1 to generate random numbers,
  1. Which can be used in Rules as well as in Turbo Integrator (TI)
  2. Which is uniformly distributed between 0 and 1
  3. That generates a decimal with 9 digit precision (theoretically up to a billion combination of numbers)
  4. Whose seed is generated at the start of TM1 server
While I was analyzing the random number distribution, I noticed certain odd behavior.  Upon narrowing down the possible culprit, what I found out is that, IBM Cognos TM1 Rand () function can generate up to 65,536 unique numbers.  Thereafter it starts repeating the numbers.  To test this behavior, enter below piece of code in the prolog of a TI process and execute it.
i = 1; iMax = 65536; WHILE ( i <= iMax *2 );
    IF (i <= iMax);
        vFile = 'sk1.txt';
    ELSE;
        vFile = 'sk2.txt';
    ENDIF;
    vFile = GetProcessErrorFileDirectory | vFile ;
    AsciiOutput (vFile, NumberToString (Rand()) );
    i = i + 1;
END;
It will generate 2 files where in
  • sk1.txt captures 1st to 65,536 Rand() calls
  • sk2.txt captures 65,537 onwards all the way to 131,072 Rand() calls
A screen grab showing the first several lines of these 2 files is below:
Once a TM1 server is ready then you can get up to 65,536 unique random numbers.  After that it is no longer random, it is predictable (with 100% accuracy). Besides, this number is on the server basis (not user basis)
Now let's modify the code slightly to prove the point.
vFile = 'sk3.txt';
vFile = GetProcessErrorFileDirectory | vFile ;
AsciiOutput (vFile, 'Code run by: ' | TM1User () );

i = 1;
iMax = 65536;
WHILE ( i <= iMax);
AsciiOutput (vFile, NumberToString (Rand()) );
i = i + 1;
END;
Run this process.  It will now create sk3.txt.  Log out from architect and log back in with a different user.  Modify the file name to sk4.txt, save and run the process
vFile = 'sk4.txt';
Let's compare sk3.txt with sk4.txt
 The random numbers generated between the 2 users are exactly the same i.e., the unique times IBM Cognos TM1 can generate random numbers is 65,536 and it is system wide (irrespective of users).  If the TM1 service associated with the server is restarted, then the slate is wiped clean.


Using ODBO as datasource in Cognos TM1 Turbo Integrator (TI) Process

Need to copy TM1 cube data from one server to another ... read below.
In IBM Cognos TM1 Turbo Integrator (TI) Process, we can use ODBO as data source type.  Using ODBO we can connect to other OLAP cubes (ex: MS SSAS, TM1 cubes in other environment). ODBO is an abbreviation of abbreviation (OLE DB for OLAP - Object Linking and Embedding DataBase for OnLine Analytical Processing)
In this post, we will see how to use this ODBO in a TI process and copy a cube content from one TM1 server to another.  To use the ODBO, we need to provide following information in the TI:
  • ODBO Provider Name - From the drop down choose IBM Cognos TM1 OLEDB MD Providee
  • ODBO Data Source - Enter your Admin Host (IP address or the DNS Alias).  If there are multiple NIC adapters present on your server, then enter the IP address on which the traffic of TM1 is routed
  • ODBO Catalog - This is the TM1 server name.  In below example we are connecting to Planning Sample instance
  • ODBO User ID, ODBO Password - Enter the credentials required to connect to the TM1 server
  • Connection Parameters - Leave it blank if you are working with native authentication (i.e. mode is 1), else you will need to enter the namespace name
Below is a screen grab of these parameters filled in.  Click on Connect.  If the parameters passed are correct, then the "Load ODBO Cube" tab (highlighted in yellow) is activated.


Note: If you have TM1 installed on AIX then please read this IBM KB article (Ref # 7041662) to work with ODBO

Before we jump ahead, let me show the cube list from the 2 environment.  In the top TM1 server there are no cubes and dimensions.  We will therefore be importing plan_Report cube from Planning Sample.  We will build the TI process to not only copy the cube data but also build the dimensions in the 1st server.

After you have successfully established the ODBO connection, click on the tab Load ODBO Cube.  Select the cube from where you want to pick the data, and enter the name of the target cube, as shown below.  Since we do NOT have the target cube, we will pick the choose option of Create cube.  Since we are copying data from one cube to another, there is possibility of copying a very large number of records.  In such scenarios, we wouldn't want to enable the logging (as this will create additional traffic, increase tm1s.log file size and slow down the process).  Therefore the option of Enable cube Logging is unchecked.

Now, click on the next tab Cube Dimensions and then on MDX Query tab, they should look like this below.  Since none of the dimensions exist in the target environment, I have chosen the option of Create and no filter is selected.  Observe the MDX of the highlighted dimension.


Let's go back to the Cube Dimensions tab and alter the filter on Departments dimension.  We could either select individual elements as shown


With level 2 selected the MDX will now appear as shown below.  Notice the change in MDX between this and the one previously shown.  In fact, you can compare the MDX for rest of the dimensions vs this one.  You will notice that, in case of Department MDX is explicitly selecting Level2 members, while in the others, it is using ISLeaf function to evaluate.


Now Save the process as LoadCube_ODBO and close the TI Editor. Let's take a look at the processes list in the target environment.


Not only has it created the main process, but it also has created child processes for each of the dimension involved in the cube build.  If you were to look in the prolog of the main process, in our case "LoadCube_ODBO", you will see that it executes the child processes first, before beginning the main process!

 
Well, I guess the engine is smart enough to create the child processes and in turn use them in the main process.  One limitation feature is that, if you were to open the main process, don't do anything else, just do a save as, in our case let's save it as "LoadCube_New_ODBO" and refresh the architect screen.  You will notice there is only one new process added to the existing list, as seen below:


The next logical question is, whether in the prolog tab of the new process
  • Is it still calling the old processes of dimension build? OR
  • Is it calling the processes with new name in dimension build?
If it is the latter, then surely there is a problem, isn't it?  The processes with new name for dimension build don't exist yet.  So let's just click on the prolog code (don't do anything else), notice the prolog code


It looks like we have a problem, don't we?  The processes are using new TI names for dimension build and yet in the architect they are not there!  We are still not done yet :) ... We were in the prolog screen looking at the code; now, click on save button and check out architect.  The processes have now been magically renamed to use the new names !!!  This is the feature you got to be aware of.


 Happy ODBOing!


Thursday, June 25, 2015

IBM Cognos TM1 Import source in SPSS reads incorrect data from TM1 Cube - How to fix it?

Last week, I published a post on reading IBM Cognos TM1 data into SPSS Modeler, using the newly available source palette within SPSS Modeler called "IBM Cognos TM1 Import".  One of my colleagues posed a question, where in she was getting incorrect results using Cognos TM1 cube as source in SPSS.  Last digit of the number gets dropped off in SPSS Modeler!


If you are on SPSS Modeler ver 17, there is no need to fret.  This is seen only in SPSS Modeler Ver 16.  There is a well documented KB article on IBM Site - "IBM Cognos TM1 Import source node is reading continuous data incorrectly" (Reference #:1683459).  The article tells us to modify the Process ExportToSPSS to fix the issue
Value = if(VALUE_IS_STRING = 1, SVALUE, NumberToStringEx(NVALUE,'#####0.0##', '.', ','));
This post describes how to make this change in the process.  There are 3 ways to implement this fix:
  1. Use IBM Cognos TM1 Architect
  2. Use IBM Cognos TM1 Performance Modeler
  3. Using Text Editor

Text Editor

You would really need to know what you are doing here.  There are numbers present in the beginning of every line, which TM1 system uses to parse out the code in a TI.  A wrong modification will result in unexpected behavior of the program, including errors.  I would not recommend this approach!

TM1 Performance Modeler

By far the easiest way to fix the code, especially in the current scenario.  I will explain more about using Architect and the problems faced, later.  If you open TM1 Performance Modeler, locate the TI process, double click, edit and save.  That's it.  You are ready to use the modified code in SPSS Modeler.
While the change is easy and swift to make, adding an extra line of code in TM1 Performance Modeler increased the file size from 55KB to 126KB !


TM1 Architect

If you open TM1 Architect, logon to the server, locate the TI and when you double click it, you get 2 error messages right away.  See the screens below:

The reason these messages pop up is because, this TI process uses IBM Cognos TM1 Cube View as data source and there is no cube view defined for it.:

If you click on Variables tab,you will notice there are 128 variables present.  So we will need to create a cube with 127 dimensions (yes that's right 127 dimensions, not 128).  128th variable will be the value (SValue or NValue) of the measure.


Using Architect to modify the process is not straightforward and will involve little bit of workaround.  I will explain that in detail here.  Below are the steps that need to be taken:
  • Create a cube with 127 dimensions
To help you create a cube with 127 dimensions, I have created a TI process.  At this time of writing I am not sure, how to attach a file (other than media) to the blog.  Therefore I am pasting the code below.  In this process, couple of parameters are defined and the code exists only in the Prolog tab.

vs_CubeName = pCubeName;
vi_MaxDims = 127;
IF (CubeExists (vs_CubeName) > 0);
    ItemReject ('Cube already exists. Quitting program with error');
    ProcessError;
ENDIF;
WHILE (vi_MaxDims > 0);
    vs_DimName = pDimName | NumberToStringEx (vi_MaxDims, '000', '', '');
    IF (DimensionExists (vs_DimName) = 0);
        DimensionCreate (vs_DimName);
        DimensionElementInsert (vs_DimName, '', vs_DimName, 'N');
    ENDIF;
    vi_MaxDims = vi_MaxDims - 1;
END;
CubeCreate (vs_CubeName,
    pDimName | '001', pDimName | '002', pDimName | '003', pDimName | '004', pDimName | '005', pDimName | '006', pDimName | '007', pDimName | '008', pDimName | '009', pDimName | '010', pDimName | '011', pDimName | '012', pDimName | '013', pDimName | '014', pDimName | '015', pDimName | '016', pDimName | '017', pDimName | '018', pDimName | '019', pDimName | '020', pDimName | '021', pDimName | '022', pDimName | '023', pDimName | '024', pDimName | '025', pDimName | '026', pDimName | '027', pDimName | '028', pDimName | '029', pDimName | '030', pDimName | '031', pDimName | '032', pDimName | '033', pDimName | '034', pDimName | '035', pDimName | '036', pDimName | '037', pDimName | '038', pDimName | '039', pDimName | '040', pDimName | '041', pDimName | '042', pDimName | '043', pDimName | '044', pDimName | '045', pDimName | '046', pDimName | '047', pDimName | '048', pDimName | '049', pDimName | '050', pDimName | '051', pDimName | '052', pDimName | '053', pDimName | '054', pDimName | '055', pDimName | '056', pDimName | '057
', pDimName | '058', pDimName | '059', pDimName | '060', pDimName | '061', pDimName | '062', pDimName | '063', pDimName | '064', pDimName | '065', pDimName | '066', pDimName | '067', pDimName | '068', pDimName | '069', pDimName | '070', pDimName | '071', pDimName | '072', pDimName | '073', pDimName | '074', pDimName | '075', pDimName | '076', pDimName | '077', pDimName | '078', pDimName | '079', pDimName | '080', pDimName | '081', pDimName | '082', pDimName | '083', pDimName | '084', pDimName | '085', pDimName | '086', pDimName | '087', pDimName | '088', pDimName | '089', pDimName | '090', pDimName | '091', pDimName | '092', pDimName | '093',
pDimName | '094', pDimName | '095', pDimName | '096', pDimName | '097', pDimName | '098', pDimName | '099', pDimName | '100', pDimName | '101', pDimName | '102', pDimName | '103', pDimName | '104', pDimName | '105', pDimName | '106', pDimName | '107', pDimName | '108', pDimName | '109', pDimName | '110', pDimName | '111', pDimName | '112', pDimName | '113', pDimName | '114', pDimName | '115', pDimName | '116', pDimName | '117', pDimName | '118', pDimName | '119', pDimName | '120', pDimName | '121', pDimName | '122', pDimName | '123', pDimName | '124', pDimName | '125', pDimName | '126', pDimName | '127');
ViewCreate (vs_CubeName, 'All');
  • Save and run the TI Process.  You will now see the cube name you supplied in parameter created and has 127 dimensions
  • Map the data source of the process to use a view on this 127 dimension cube
To do this, open the ExportToSPSS process in Architect.  Click Ok on any errors you get.  In DataSource Tab, click on Browse and select the cube you created and choose "All" as the view

After this, click on the Variables tab, you will be prompted with couple of options.  Choose the one highlighted

You can now go to the Data Tab, do the modification as recommended in the KB Article.  Comment out the old line and add the new line and save the process.  Ensure that preview in the IBM Cognos TM1 Import Palette runs correctly.
# vValue = if(VALUE_IS_STRING = 1, SVALUE, NumberToString(NVALUE));
vValue = if(VALUE_IS_STRING = 1, SVALUE, NumberToStringEx(NVALUE,'#####0.0##', '.', ','));

Closing Thoughts

  • If you are on IBM SPSS Modeler Ver 17, you will not face the issue of last digit being dropped
  • Modifying the code through TM1 Performance Modeler is fastest; but it increases the file size by 2.5 times.  We will need a file compare utility to figure out what has been additionally added by TM1 Performance Modeler
  • Using TM1 Architect is clean, however you will need to follow certain steps, before you are ready to make the change
  • In Ver 17, the file is named slightly different and the code difference between ver 16 and 17 is huge.  See below screen

  • As mentioned in my last blog, if you upgrade to a newer version of SPSS, there is need to copy these 3 files all over again to the various DATA directory of the TM1 server you are working with