Showing posts with label TI. Show all posts

Tuesday, October 20, 2015

Working with Undefined (Null) Values in an IBM Cognos TM1Cube

▬▬▬▬▬▬▬▬▬▬▬▬▬▬ஜ۩۞۩ஜ▬▬▬▬▬▬▬▬▬▬▬▬▬▬
In an IBM Cognos TM1 server, by default numeric values are stored as 0.  When the cell content is retrieved either in TI or through rules, a value of zero is returned.  This means TM1 does NOT differentiate between missing data (null value) and zero.  In other words, you will not be able to differentiate the cells for which there does not exist data, with the ones where data is 0. 
To work with situations where we need to differentiate between missing data and zero, we can use UNDEFVALS in the rule of an IBM Cognos TM1 cube.  If UNDEFVALS is used then the default value is changed from 0 to a special undefined value.

Let’s create a simple 3 dimensional cube available from Planing Sample database, namely:
  1. plan_version
  2. plan_business_unit
  3. plan_department
We will be working with integer data alone.  The cube looks like this, without any rules;


Let us go ahead and add this as the 1st line of the rules file and save the rules.  Notice the view

 
All the Zeroes have vanished and instead you will see blanks.  At the intersection of UK and Direct, key a value of 0, turn on zero suppression and recalculate the view.  It will appear like this:


03_UKDirectZero

 
It means that, zero suppression will actually turn off the special undefined value, instead of zeroes.  It is a side effect of using UNDEFVALS in the rule definition.  This unintended consequence is visible in Turbo Integrator (TI) as well.


If you were to save this view and use it as source in TI (see screen for the view spec), then perform an AsciiOutput of the data records, you will get zeroes as part of your data.

How to reset data in a cube with UNDEFVALS?

In a cube without UNDEFVALS, if there is a value in an intersection of a cube and you hit delete, then the intersection value is reverted to zero.  Let us consider ways to accomplish this in a cube with UNDEFVALS.
Manual Option
This is applicable only if you have limited cells to work with.  As mentioned in this IBM KB, by inputting a value of 4.94066e-324 in the intersections.  To illustrate this, look at the screenshot below.  The LHS of the picture shows where a value of zero was present.  And on the RHS by inputting the aforementioned value and hitting recalc, the  zeroes goes away.


Turbo Integrator (TI) Option
  • CubeClearData – This will reset all the non-rule driven intersections to the undefined/null value
  • Sometimes however you may want to reset only part of cube and not the entire cube.  Our instinct is to use ViewZeroOut.  However ViewZeroOut on an UNDEFVALS cube will only ZERO out the intersections, it will NOT reset the intersections to undefined/null value
  • In such situations, you can use CellPutN a value of 4.94066e-324 in those intersections and reset the data to undefined/null value
  • Alternately you can use new function in 10.2 UndefinedCellValue for this case (valid in both rules and TI).  This function returns either 0 (on a cube without Undefvals declaration) or special undefined value (on a cube with Undefvals declaration) – see below snippet
vx_UndefValue = UndefinedCellValue (vs_CubeName);
CellPutN (vx_UndefValue, vs_CubeName, ‘FY 2003 Budget’, ‘UK’, ‘Finance’);

10.2 Reference Guide documentation incorrectly states that cube name is an optional parameter; APAR PI50000 is raised to correct it.  If the cube name is not supplied then the function returns 0.

How to check for an undefined/null value in cube?

Foremost of all, to know which cubes have UNDEFVALS declaration, you can loop through the }Cubes dimension and pass it to UndefinedCellValue function; an AsciiOutput of this call will list such cubes.  This is possible only in 10.2.

Well, let’s suppose you do have a cube with UNDEFVALS.  When you want to work with such cubes, you’d like to know whether or not, given intersection has undefined/null value in it.  To do that you can utilize the ISUNDEFINEDCELLVALUE function (valid in both rules and TI)

IsUndefinedCellValue function compares the passed value to the cube’s default view and returns 1 if true; otherwise it returns 0.  Now let’s go ahead and add below rule line
Undefvals;
[‘Germany’] = N:
    IF ( IsUndefinedCellValue ( [‘UK’] ) = 1    
        , UndefinedCellValue    
        , 88   
        );
I am trying assign a value of 88 for all cells of Germany, where corresponding cells of UK have a valid value (including 0).  With some sample values assigned, a view of the Cognos TM1 cube with UNDEFVALS will look like below (please note Marketing and Engineering are NOT the children of Sales, they are children of Total Org):


Let’s now add Skipcheck and Feeders to the rules file to see its impact with zero suppression on the cube view:
SKIPCHECK;
Undefvals;
    
[‘Germany’] = N:
    IF ( IsUndefinedCellValue ( [‘UK’] ) = 1    
        , UndefinedCellValue    
        , 88    
        );
FEEDERS;
[‘UK’] => [‘Germany’];


Notice that a value of zero (UK, IT) is able to FEED the (Germany, IT) intersection.  This is one of the impact of using UNDEFVALS in the cube.

If you want to find out the actual value of the special undefined value that IBM Cognos TM1 server assigns to your cube, then you can write a small TI snippet to find that out.  See screenshot below:


Catalogue your dimension creation processes in Cognos TM1

Are you at the helm of maintaining a very large TM1 model?  Or did you inherit a TM1 model and want insight into the system?  Say you have a new person on the team and he/she is not sure which process creates what dimension!

Well, the below post will help you make your job little easier, at least when it comes to dimension creation/updation. We are going to leverage the }DimensionAttributes control cube for a neat trick to map dimensions with their create/update processes.  This control cube stores attributes for all the dimensions that appear in your TM1 server.

Let’s see, a large TM1 model includes several dimensions – most of which are created through TI processes.  This is true in many implementations, since metadata for your model is sourced from external systems, which feed into TM1.  At the end of day, your Architect will look like this –


Right click on “Dimensions” -> Choose “Edit Attributes


From “Edit” menu, choose “Add New Attribute


Type “CreatedBy” as attribute name of Type “Text” and click OK.  Your screen should now look like:


You will see the newly created attribute along with others that currently exist on your system.  Click OK.  Go back to Architect


When we created a new attribute “CreatedBy” for the dimensions, IBM Cognos TM1 behind the scenes updates a control cube }DimensionAttributes.  You can choose to display control objects in your Architect and see how the cube looks like.  All that is now left, is to modify your dimension creation process and add a small piece of code in the Epilog.  To illustrate this, I will use a text file as source and create a dimension “A_Sample_Dim”.  Text file has following data in it:
ElemName, ParentName
Direct, Sales
Indirect, Sales
PSO, Sales
Sales, TOTAL ORG
Maketing, TOTAL ORG
Engineering, TOTAL ORG
GA, TOTAL ORG
Finance, GA
IT, GA
Administration, GA
Create a new process to use this as source for your Turbo Integrator process and choose appropriate fields as shown below:


Go to Variables tab and in “Contents” choose as “Other” for both the variables.  Below is the code in various tabs

PROLOG
vs_DimName = ‘A_Sample_Dim’;
IF (DimensionExists (vs_DimName) = 0 );
    DimensionDestroy (vs_DimName);
ENDIF;
DimensionCreate (vs_DimName);
METADATA
DimensionElementInsert (vs_DimName, ”, ElemName, ‘N’);
DimensionElementInsert (vs_DimName, ”, ParentName, ‘N’);
DimensionElementComponentAdd (vs_DimName, ParentName, ElemName, 1);
This is the normal dimension creation process that most developers follow.  As mentioned before, we will need to add a small piece of code in the Epilog with following contents in it:

vs_CubeName = ‘}DimensionAttributes’;
vs_TIName = GetProcessName;
CellPutS (vs_TIName, vs_CubeName, vs_DimName, ‘CreatedBy’);

Save and run your code.  You should now see the value in Architect.  This approach has to be adopted for all the dimension creation/updation process.


Closing Thoughts:

  1. Approach to populate the }DimensionAttributes cube to note the processes that build your TM1 model dimensions will go in a long way, for your ongoing support
  2. This approach need not be limited to process creation alone, you could extend this to various attributes that you could think of, on a given dimension.  For ex: owner, updation frequency, source etc.  All you’d need is additional attributes to capture them
ps: Help give feedback on the content.  At the top of the post (just below title), indicate your rating.  I’d appreciate that!

Tuesday, September 8, 2015

Cognos TM1 Chores: Single Commit vs Multiple Commit


A chore in IBM Cognos TM1 server is a container for a group of one or more Turbo Integrator (TI) Processes.  It defines the sequence in which the processes are executed. These processes inside of a chore are executed sequentially – in other words, the 2nd process in a chore is executed after the 1st one finishes; 3rd process is executed after the completion of the 2nd one … and so on.
Chores can also be used to run the same process multiple times – in such scenarios, the parameters passed to the process will be different.
  • Chores once activated (enabled) run periodically on the set schedule.  When the chore is run from a schedule, it runs on its own thread.
  • Alternately, you could right click on the chore and run it on demand
Irrespective of how the chore is run, all the TI processes are embedded in one transaction.  This means that any locks acquired by the 1st process are held onto, until the last process is completed.  Therefore any data updates done by the group of TIs in the chore are committed, only when the last process is completed.  This is the default behavior of Cognos TM1 server.

Starting from 10.1, we now have a provision to commit each TI in a chore as and when it is processed.  In such scenarios, the locks are not held onto, until the last process is completed.  Therefore, the data modified by a TI in chore is committed and locks are released, when its execution within the chore is complete.

Let’s look at an example, which demonstrates the difference between the 2 options – Single Commit versus Multiple Commit.  To illustrate this, I will use a simple cube, 3 TI processes and 2 chores.


1st TI Process – All it does is increment the value by 10 in the 1st intersection of the cube

vi_Value = CellGetN (vs_CubeName, ‘A’, ‘E1’, ‘zDim_03’);
AsciiOutput (GetProcessErrorFileDirectory | ‘sk03.txt’, ‘Before: ‘ | NumberToString (vi_Value) );
CellIncrementN (10, vs_CubeName, ‘A’, ‘E1’, ‘zDim_03’);
vi_Value = CellGetN (vs_CubeName, ‘A’, ‘E1’, ‘zDim_03’);
AsciiOutput (GetProcessErrorFileDirectory | ‘sk03.txt’, ‘After: ‘ | NumberToString (vi_Value) );

2nd TI Process – This waits for sometime, before incrementing the value by 10 for the aforementioned intersection
vi_SimplyWaitCounter = 10000000 * 2;
WHILE (vi_SimplyWaitCounter > 0);
vi_SimplyWaitCounter = vi_SimplyWaitCounter – 1;
END;
val = CellGetN (vs_CubeName, ‘A’, ‘E1’, ‘zDim_03’);
AsciiOutput (GetProcessErrorFileDirectory | ‘sk01.txt’, ‘Before: ‘ | NumberToString (val) );
CellIncrementN (10, vs_CubeName, ‘A’, ‘E1’, ‘zDim_03’);
val = CellGetN (vs_CubeName, ‘A’, ‘E1’, ‘zDim_03’);
AsciiOutput (GetProcessErrorFileDirectory | ‘sk01.txt’, ‘After: ‘ | NumberToString (val) );

3rd TI Process:  Almost same as 1st process, except that it writes to sk03.txt, instead of sk01.txt and increments intersection value by 5 instead of 10

1st chore: Comprises of Process 1 and Process 2
2nd Chore: Comprises of Process 3 alone

Scenario 1 – Single Commit

Run Chore 1 on demand (from one session).  Run Chore 2 on demand (from another session).  If you open the cube, the value will be 20.  Here’s chart showing what transpired.


  • 1st TI process in Chore 1 (named Process 1) executes and puts value of 10 in the cube. This happens in a fraction of second.  By this time the 2nd TI in the chore 1 (named Process 2) is already running and doing its wait. 
  • Now the 1st TI from Chore 2 (named Process 3) is executed. 
  • When it reads the value from the cube, it reads it as 0.  Although the process 1 from chore 1 is completed, we have used Single Committ, so the committed value is not visible outside of the chore (i.e. in process 3 of chore 2). 
Therefore the final value in the cube is 20 (10 + 10) as opposed to 25 (10 + 5 + 10)!  You can see the cube value and the log entries below:


Scenario 2 – Multiple Commit

Clear the value in the cube.  Then run Chore 1 on demand (from one session).  Run Chore 2 on demand (from another session).  If you open the cube, the value will be 25.  Here’s chart showing what transpired.

  • 1st TI process in Chore 1 (named Process 1) executes and puts value of 10 in the cube. This happens in a fraction of second.  After this the data is committed and the locks are released.  By this time the 2nd TI in the chore 1 (named Process 2) is already running and doing its wait.
  • Now the 1st TI from Chore 2 (named Process 3) is executed.
  • When it reads the value from the cube, it reads it as 10 (instead of 0).  This is because of multi commit
  • After few seconds, when the Process 2 in Chore 2 reads the value, it shows 15 (10 + 5).  It then adds 10 more to it, totaling the result to 25


Friday, August 7, 2015

Add dummy data to a cube or muddle data to make it unintelligible

In continuation from my last post  – Creating a large dimension, this post will describe how we obfuscated data in an existing cube.  The premises on which these 2 processes were built, was to mimic the most voluminous cube for support; then reproduce the myriad of issues that accompanied this cube (be it in TM1, Cognos BI or Cognos Insight).

Goal is to obfuscate the numbers, and modeled on Dilbert’s logic :)


To illustrate, I have built a sample cube with few dimensions.  Time dimension has months from Jan 2014 through Dec 2014.  There is Chart of Accounts as well as dimension with Regions (picked from Planning Sample database).  Also there is a dimension called “aLargeDim” – this is the one with close to half a million elements in it.  For the purpose of demonstration I have created it with 1,000 elements in it.

Turbo Integrator (TI) process we have consists of code in Prolog, Data and Epilog tabs.  The original process I had, is slightly modified to add dummy data to the cube.  Since I cannot attach files in WordPress, I will explain it with snippets of code.  Please note that I have only shown snippets of code.  It will serve you as a template to build on it.

Parameters


You’d need to specify the cube name and option 1 (to add dummy data) or 2 (muddle data to make it unintelligible).  The last 2 parameters are required, if you are adding new data.  It controls the volume of data being added (defined in percent) and on what dimension you’d like to control.

Prolog

Some housekeeping steps like disabling the logging on cube is not shown.  Bulk of the code in Prolog is made up of the while loop.
  • If we are adding data, then we are calculating the number of intersections in the cube (highlighted in maroon color)
  • If we are adding data, then pick only percentage of members from the dimension mentioned in the parameter name (highlighted in green color). Say there are 1,000 elements in it and pi_PercentPopulate is 20, then the code will pick every 5th element (100/20 = 5) … there by totaling the number of that dimension elements to 200 (20% of 1000 = 200)
  • If we are adding new data, then we need to pick cells in a view that are zero (skip zeroes set = 0)
  • If we are making existing data unintelligible, then we need to pick only the non-zero value (skip zeroes set = 1)
vi_CellCount = 1;
vi_AddCount = 0;

i = 1;
vs_DimName = TabDim (vs_CubeName, i);
WHILE (vs_DimName @<> ”);
    # Calculate the total cell count.  This is required when we need to populate a % of cells
    vi_DimSiz = DimSiz (vs_DimName);
    vi_ElemCnt = 0;
    IF (pi_AddData = 1);
        WHILE (vi_DimSiz > 0);
            IF (ElLev (vs_DimName, DimNm (vs_DimName, vi_DimSiz)) = 0 );
                vi_ElemCnt = vi_ElemCnt + 1;
            ENDIF;
            vi_DimSiz = vi_DimSiz – 1;
        END;
        vi_CellCount = vi_CellCount * vi_ElemCnt;
    ENDIF;
IF (SubsetExists (vs_DimName, vs_SubName) <> 0 );
SubsetDeleteAllElements (vs_DimName, vs_SubName);
ELSE;
SubsetCreate (vs_DimName, vs_SubName);
ENDIF;
    IF (Upper (ps_DimName) @= Upper (vs_DimName) & pi_AddData = 1);
        # If the dimension name matches to the prompt value, then pick only % of its elements
        # Ex: if pi_PerCentPopulate = 20, then pick 20% of elements from this dimension
        vi_DimSiz = DimSiz (vs_DimName);
        vi_ModCount = Round (100 \ pi_PercentPopulate);
        vi_SubInsPt = 1;
        WHILE (vi_DimSiz > 0);
            IF (ElLev (vs_DimName, DimNm (vs_DimName, vi_DimSiz)) = 0 & Mod (vi_DimSiz, vi_ModCount) = 0);
                SubsetElementInsert (vs_DimName, vs_SubName, DimNm (vs_DimName, vi_DimSiz), vi_SubInsPt);
                vi_SubInsPt = vi_SubInsPt + 1;
            ENDIF;
            vi_DimSiz = vi_DimSiz – 1;
        END;
    ELSE;
        # Otherise use all the elements in the dimension
        SubsetIsAllSet (vs_DimName, vs_SubName, 1);
    ENDIF;
    ViewSubsetAssign(vs_CubeName, vs_ViewName, vs_DimName, vs_SubName);
    i = i + 1;
    vs_DimName = TabDim (vs_CubeName, i);
END;
vi_NumOfDims = i – 1;
# If we are adding data and ps_DimName is not a valid one, then quit
# Otherwise we will end up processing 100% of intersections
IF (pi_AddData = 1 & vi_SubInsPt <= 1);
ProcessQuit;
ENDIF;
IF (pi_AddData = 1);
    # If we are adding data, then we need to conisder the blank cells
    ViewExtractSkipZeroesSet     (vs_CubeName, vs_ViewName, 0);
ELSEIF (pi_AddData = 2);
    # If we are modifying data, then we ned to modify only the non-zero cells
    ViewExtractSkipZeroesSet     (vs_CubeName, vs_ViewName, 1);
ENDIF;

Data Tab

In the data tab, we call a random value and then multiply it with the existing data (if required).  The underlined piece feel free to change it whatever you want.

vi_RandVal = Rand ();
IF (pi_AddData = 1);
# Skip every so often
vi_Populate = IF (vi_RandVal < 0.33333, 0, 1);
IF (vi_Populate = 0 );
ItemSkip;
ENDIF;

IF (vi_AddCount > (pi_PercentPopulate * vi_CellCount \ 100));
ProcessBreak;
ENDIF;
ENDIF;

vi_Sec = StringToNumber (TimSt (Now (), ‘\s’) );
vi_NewVal = (NValue + (100 * vi_Sec) ) * 0.75 * vi_RandVal ;
vi_AddCount = vi_AddCount + 1;

IF (vi_NumOfDims = 2);
CellIncrementN (vi_NewVal, ps_CubeName, Dim_001, Dim_002);
ELSEIF (vi_NumOfDims = 3);
CellIncrementN (vi_NewVal, ps_CubeName, Dim_001, Dim_002, Dim_003);
ELSEIF (vi_NumOfDims = 4);
CellIncrementN (vi_NewVal, ps_CubeName, Dim_001, Dim_002, Dim_003, Dim_004);
ELSEIF (vi_NumOfDims = 5);
CellIncrementN (vi_NewVal, ps_CubeName, Dim_001, Dim_002, Dim_003, Dim_004, Dim_005);
… R E P E A T    T H E   B L O C K     F O R    A S    M A N Y     D I M E N S I O N S    Y O U    H A V E

Epilog tab has not much code in it, except to turn the logging on the cube, back to initial value.

Demonstration


Ok, not literally … but for those, who insist on seeing accurate numbers (to the decimal) it may lead to confusion :)

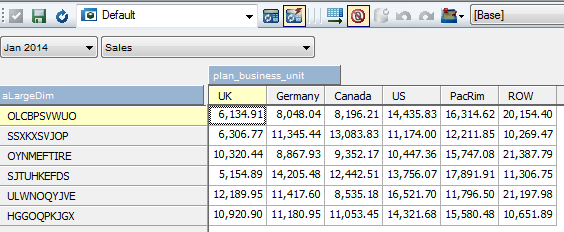
I have entered some predefined values in ‘Sales’ account for Jan 2014. This is what the data looks like. Nice, round numbers are present. We will run the code with option 2 for pi_AddData parameter.


This is the output after running the process.  Process runs fairly fast, as we have to work with <100 rows.  As you can see the numbers are distorted.


Let’s clear the data in the cube and re-run the process with pi_AddData = 1 and populate about 5% of cells.  The output will look something like this – shown for couple of accounts for Jan 2014.  Data however is spread across all the months and accounts.


References:

Happy Data Manipulation to you!

Monday, July 27, 2015

Create a very large dimension in Cognos TM1 using Turbo Integrator (TI)

There are instances during an implementation where in, there is a need to export out one or more cubes for Support.  However, client has reservation against data being taken out from their premises despite:
  • Having signed an NDA (Non Disclosure Agreement)
  • Erasing out original data and loading arbitrary data
Recently we ran into such situation.  Over the course of this and the next post, I will cover steps that we took to simulate the cube for Support.


The cube that we wanted to replicate had bunch of dimensions, that we could easily mimic – like Time, Chart of Accounts, Region, Type, Indicators etc.  However, for a one particular dimension it was a daunting task to mimic (at least manually).  It has about 500,000 elements in it.  The number of elements in it, continues to grow month-on-month basis, with a potential of adding roughly couple of thousand elements each month.

Besides being THE largest dimension in our model, entire implementation revolved around it.  Hence it was critical to have it mimicked and also load arbitrary data in couple of cubes using this dimension.

The TI process code is pasted below.  It accepts few parameters, the description is mentioned as well.  We’d need to enter the dimension size (number of leaf level elements), length of each element, whether they are numeric/text/alphanumeric and lastly the dimension name.


 This code relies heavily on the random number generation to determine the numbers/characters that go into the element.  So it natural to encounter is the repetition of random numbers in TM1 after 65,536 times.  Check out my previous post on this!

Here we are attempting to create half a million random elements which are made up of only text characters.  As you increase the number to a million or two, there is possibility of elements that are formed are repeated (since random numbers in TM1 start repeating).  In such instances, attempts to create elements upto the parameter specified may run into an infinite loop.  To avoid the possibility running the code forever, I am breaking the execution, if the attempt to create an element goes above 10K the dimension size. 

Turbo Integrator (TI) Code consists of only the prolog tab and here is the actual code:

vi_Siz = IF (pi_Siz = 0, 10000, pi_Siz);
vi_Len = IF (pi_Len = 0, 10, pi_Len);
vs_DimName = ps_Name;
vi_Attempt = 0;
vi_MaxHit  = 0;
vi_MulFac  = 1;
IF (DimensionExists (vs_DimName) > 0);
    # Either destroy the dimension or stop execution, based on your preference
    DimensionDeleteAllElements (vs_DimName);
ELSE;
    DimensionCreate (vs_DimName);
ENDIF;
WHILE (vi_Siz > 0);
    vs_Elem = ”;
    vi_Ctr = 1;
    WHILE (vi_Ctr <= vi_Len);
        # TM1 starts repeating random numbers after 65,536 times.  Hence use a multiplication factor to change the random value
        IF (vi_MaxHit = 64500);
            # This is where you can play around and alter way random numbers are generated
            vi_MulFac = vi_MulFac + Rand() * 2 + Rand ();
            vi_MaxHit = 0;
        ENDIF;
        vi_RandVal = Rand() * vi_MulFac;
        # If dimension elems are only numeric or alpha numeric with 50% of probablity, enter this block
        IF (pi_AlphaNumeric = 1 % (pi_AlphaNumeric = 3 & vi_RandVal < 0.5));
            vi_RandMod = Round (Mod (vi_RandVal * 10, (vi_Len -1)));
            vs_NewLetter = NumberToString (vi_RandMod);
        # If dimension elems are only string or alpha numeric with the other 50% of probablity, enter this block
        ELSEIF (pi_AlphaNumeric = 2 % (pi_AlphaNumeric = 3 & Rand() >= 0.5));
            vi_RandMod = Round (Mod (vi_RandVal * 100, 25));
            vs_NewLetter = Char (65 + vi_RandMod);
        ENDIF;
        vi_Ctr = vi_Ctr + 1;
        vs_Elem = IF (vi_RandVal < 0.5, vs_Elem | vs_NewLetter, vs_NewLetter | vs_Elem);
        vi_MaxHit  = vi_MaxHit + 1;
    END;
    IF (DimIx (vs_DimName, vs_Elem) = 0);
        DimensionElementInsert (vs_DimName, ”, vs_Elem, ‘N’);
        vi_Siz = vi_Siz – 1;
    ENDIF;
    vi_Attempt = vi_Attempt + 1;

    # Stop the loop, if the number of times you have attempted to create elements is about 10,000 higher than the element count
    # You can increase/decrease the number to your preference
    IF (vi_Attempt > pi_Siz + 10000);
        vi_temp = vi_siz;
        vi_Siz = 0;
    ENDIF;
END;

AsciiOutput (GetProcessErrorFileDirectory | ‘sk.txt’, ‘Number of time executed ‘ | NumberToString (vi_Attempt) | ‘, ‘ | NumberToString (vi_temp));

The code an be modified to make the elements begin with a certain character(s) like ‘SKU_’, ‘CC’ etc.  This is what the properties window shows after the code is run and some sample elements.


Thursday, July 23, 2015

Write to tm1server.log file from Turbo Intergrator (TI) process in Cognos TM1


All TM1 developers often use the TI function AsciiOutput to write to a file.  Most circumstances that lead to using AsciiOutput function is during troubleshooting of a TI process.
 
When the process does not behave as expected, we put the contents of multiple variables in a file at various places in the code, in conjunction with ProcessQuit and troubleshoot an issue.

What if you ever wanted to write something to tm1server.log, say to troubleshoot an issue or to capture information of your TI events?

Option 1: Use AsciiOutput

One of the options we have, is to use AsciiOutput.  Pitfall with this approach is that you will loose all the entries in tm1server.log, prior to the execution of your TI process.  This is not a preferred method to do it anyway!  (Unless AsciiAppend functionality sees light of the day, which hasn’t happened in last few years)

AsciiOutput (GetProcessErrorFileDirectory | ‘tm1server.log’, ‘This is a sample message’);

Option 2: Use Custom script (VB or Java)

Secondly, you could write a custom VB or Java script that accepts string as parameter and you could call the script using ExecuteCommand.  The script can be written in such a way to append to the tm1server.log file.  One thing to bear in mind is that the string that gets appended to the file, has the same column format as the tm1server.log.  This way the messages are standardized and your message doesn’t stand out.

Option 3: Use Java extensions in TI

With the Java Extension support in TI, IBM provides you the capability of writing to the tm1server.log.  Here’s the link to the article, explaining you how to do it.

Option 4: Use the new TI function LogOutput

Please read this completely before trying it out.  With 10.2.2 there are new loggers available.  Among them is TM1.TILogOutput; this logger allows you to write messages directly to the tm1server.log file.
Let’s create a simple TI Process with following lines of code and execute it:

LogOutput (‘INFO’, ‘HELLO WORLD – INFORMATION’);
LogOutput (‘DEBUG’, ‘HELLO WORLD – DEBUG’);
LogOutput (‘ERROR’, ‘HELLO WORLD – ERROR’);

LogOutput (‘info’, ‘Hello World – Innformation’);
LogOutput (‘debug’, ‘Hello World – Debug’);
LogOutput (‘error’, ‘Hello World – Error’);

The output will look like this:

The 1st parameter of the LogOutput function expects the message level – Info, Debug or Error.  It is NOT case-sensitive.  As evidenced by the output, the lines are repeated in the tm1server.log.  The output is tempting for those with curious eyes.  The line for debug (2nd and 4th in the TI) is not printed out.  For the TI to print out debug messages in the log file, we’d need to enable the logger TM1.LogOutput in tm1s-log.properties file.

If you already have a tm1s-log.properties file, then all you need to do is add this line.  If you do not have this file, you can locate one in the directory of each sample TM1 database.

log4j.logger.TM1.TILogOutput=DEBUG
Now re-run your process.  The output will look like this.

Passing Remark on tm1s-log.properties file:

    • tm1s-log.properties file should be located in the same directory as that of TM1s.cfg file
    • To suspend the logging set the logger value to OFF (log4j.logger.TM1.TILogOutput=OFF)
Reference – TM1 Taking a Peek Under the Covers, and Learning how to Troubleshoot (Session #1169 @ IBM Vision 2015)
 

Thursday, July 16, 2015

How to order/sort data in cube view used as a data source in Turbo Integrator (TI)?

An IBM Cognos TM1 cube view can be used as data source in a Turbo Integrator (TI) process. When such a view is used as a data source in TI, there is no control offered on how the cell intersections appear for processing. The order in which they appear, is determined by dimension index in the cube, and the subsets assigned for these dimensions.

Sometimes there is a need to process the data in an ordered format (say work top down i.e. process the data in descending order). We will look at ways to accomplish this.
Irrespective of the approach we take, it involves 3 steps namely –
  1. Export the entire data
  2. Order the data
  3. Use the Ordered data as data source
I will not delve into #1 (Export the data) and #3 (Use the ordered data).  These are straight forward steps.  Let’s discuss #2 (Order the data).  Broadly there are couple of options:
  1. Perform it outside of TM1
  2. Use a workaround and do it within TM1

Order/Sort the data outside of TM1

In this method, we’d need to export the data to a table in a database.  Use ODBC as data source and write a query with ORDER BY clause to perform the operation we need, there by leveraging the power of SQL.
Alternately, we could export to a flat file and do the ordering using excel or a scripting language of your choice.  Later this file can be used as data source.

Use Work around technique and perform the ordering/sorting withing TM1

There is no predefined function/method available in TM1 which can accomplish the work.  Instead, we will be relying on MDX and a temporary dimension to get the work done.  When everything is done, it will produce a file that is ordered/sorted per users choice – ascending or descending.  At a high level we will perform these steps:
  1. We will need one process that will read the cube view (which needs to be sorted) as data source
    • In this process, create a temp dimension in prolog
    • In addition, create ‘S’ attributes equal to the number of dimensions in the cube; plus one ‘N’ type attribute
    • In Data tab, add elements to the dimension
    • For each string attribute, add the dimension values of the cube
    • In the numeric attribute put the NValue
    • In Epilog, create a subset on this dimension using MDX expression.  We will use MDX function ORDER to sort the dimension by it’s attribute (numeric attribute) and create a subset
  2. We will need 2nd process that will use the subset as the data source.  Since the subset is already ordered, looping through the elements in this subset is equivalent to ordering the data
    • In the Data tab, we will retrieve all the attribute of the element and put it in a file
To summarize
  • We are creating a dimension which has elements equal to number of cells we will be working with
  • Add attribute to each element in the dimension.  Each attribute corresponding to the element information that make up the intersection
  • Order the elements in the dimension by using MDX function ORDER
  • Use this ordered subset and export the attributes of the element to a flat file.  This is the data we want to work with
If the number of intersections is very high (to the tune of millions) then there is overhead in terms of creating a dimension with that many elements as well as ordering it using MDX.  It might be faster to perform it in a DB … YMMV

As of writing this post, I am NOT aware of any method to attach file in the blog.  So I will try explaining it with snippets of code and screenshots.  We will use Planning Sample server and work with cube plan_BudgetPlan


In the Prolog tab of the 1st process we will build a view with the context elements highlighted.  We will also create the attributes.  The number of string type attributes equal the number of dimensions in cube and in addition, a numeric attribute to hold the intersection value.  The process accepts a parameter of ps_TempDimName … this is the dimension we will be working with to push the data and sort its elements.  Code snippets are taken from a process, which accepts 3 parameters:
  • TempDimName (explained above)
  • Sort Order (1 for Ascending and 2 for Descending)
  • Cube Name (whose data we want ORDERed BY)
AttrDelete (ps_TempDimName, ‘CubeValue’);
AttrInsert (ps_TempDimName, ”, ‘CubeValue’, ‘N’);
i = 0;
WHILE (i < vi_NumOfDims);
vs_AttrName = ‘Attr_’ | NumberToString (vi_NumOfDims – i);
AttrDelete (ps_TempDimName, vs_AttrName);
AttrInsert (ps_TempDimName, ”, vs_AttrName, ‘S’);
i = i + 1;
END;
AttrDelete (ps_TempDimName, ‘Attr_0′);

Now head over to the Data tab.  In here, we will add elements to the dimension as well as populate the attributes.  For those of you raising the eyebrows and wondering “Shouldn’t element insert happen in Metadata?“.  Take a look at the code below and check the underlined piece.  That should clear the doubt.

vs_ElemName = ‘Elem_’ | NumberToString (vi_RowCnt);
DimensionElementInsertDirect (ps_TempDimName, ”, vs_ElemName, ‘N’);

i = 1;
WHILE ( i <= vi_NumOfDims );
vs_AttrName = ‘Attr_’ | NumberToString (i);
CellPutS ( Expand ( ‘%v’ | NumberToString (i) | ‘%’), vs_AttrCube, vs_ElemName, vs_AttrName);
i = i + 1;
END;
vi_RowCnt = vi_RowCnt + 1;
CellPutN (NValue, vs_AttrCube, vs_ElemName, ‘CubeValue’);
 Let’s move on to the Epilog tab.  Here we will build the MDX expression and create the subset order in ascending or descending manner.  As the last step call the 2nd process

IF (pi_SortOrder = 1);
    vs_OrderBy = ‘ASC';
ELSE;
    vs_OrderBy = ‘DESC';
ENDIF;

vs_MDX = ‘{‘ | ‘ORDER ( TM1SubsetAll ( [‘ | ps_TempDimName | ‘]) , [‘ | ps_TempDimName | ‘].[CubeValue], ‘ | vs_OrderBy | ‘)}';

vs_Sorted_SubName = ‘zSubsetOrdered_’ | ‘vs_OrderBy';
IF (SubsetExists (ps_TempDimName, vs_Sorted_SubName) <> 0);
SubsetDeleteAllElements (ps_TempDimName, vs_Sorted_SubName);
ELSE;
SubsetCreate (ps_TempDimName, vs_Sorted_SubName);
ENDIF;

SubsetMDXSet (ps_TempDimName, vs_Sorted_SubName, vs_MDX);

ExecuteProcess (‘SECOND_PROCESS_NAME’, ‘ps_SubName’, vs_Sorted_SubName, ‘ps_TempDimName’, ps_TempDimName, ‘pi_NumOfDims’, vi_NumOfDims);

Below is a screen grab showing the attribute cube.  This would be output of the 1st process.


The 2nd process is fairly simple.  It will use Dimension Subset as data source and it will assign the Temp Dim Name’s subset  we are working with, as the source.  The Data tab of the code is pretty small.  All it does is, loop through the S and N type attributes and AsciiOutput to a file
vs_OutputStr = ”;
i = 1;
WHILE (i <= vi_NumOfDims);
IF (i=1);
vs_OutputStr = vs_OutputStr | CellGetS (vs_CubeName, V1, ‘Attr_’ | NumberToString (i));
ELSE;
vs_OutputStr = vs_OutputStr | ‘, ‘ | CellGetS (vs_CubeName, V1, ‘Attr_’ | NumberToString (i));
ENDIF;
i = i + 1;
END;
vs_OutputStr = vs_OutputStr | ‘, ‘ | numberToString (CellGetN (vs_CubeName, V1, ‘CubeValue’));
AsciiOutput (vs_FileName, V1, vs_OutputStr);
The sample file output will look like this:


 Now that you have the flat file, you can use this as data source for your 3rd process and move forward.  Just remember to handle the temp dimension and the flat file, after you are done working.  They need to cleared out.

Monday, July 6, 2015

Cognos TM1 Rand() function - it is NOT quite random after all !

Let me start the post with a Dilbert cartoon on Random number generator :)


Ok, so we have Rand() function in Cognos TM1 to generate random numbers,
  1. Which can be used in Rules as well as in Turbo Integrator (TI)
  2. Which is uniformly distributed between 0 and 1
  3. That generates a decimal with 9 digit precision (theoretically up to a billion combination of numbers)
  4. Whose seed is generated at the start of TM1 server
While I was analyzing the random number distribution, I noticed certain odd behavior.  Upon narrowing down the possible culprit, what I found out is that, IBM Cognos TM1 Rand () function can generate up to 65,536 unique numbers.  Thereafter it starts repeating the numbers.  To test this behavior, enter below piece of code in the prolog of a TI process and execute it.
i = 1; iMax = 65536; WHILE ( i <= iMax *2 );
    IF (i <= iMax);
        vFile = 'sk1.txt';
    ELSE;
        vFile = 'sk2.txt';
    ENDIF;
    vFile = GetProcessErrorFileDirectory | vFile ;
    AsciiOutput (vFile, NumberToString (Rand()) );
    i = i + 1;
END;
It will generate 2 files where in
  • sk1.txt captures 1st to 65,536 Rand() calls
  • sk2.txt captures 65,537 onwards all the way to 131,072 Rand() calls
A screen grab showing the first several lines of these 2 files is below:
Once a TM1 server is ready then you can get up to 65,536 unique random numbers.  After that it is no longer random, it is predictable (with 100% accuracy). Besides, this number is on the server basis (not user basis)
Now let's modify the code slightly to prove the point.
vFile = 'sk3.txt';
vFile = GetProcessErrorFileDirectory | vFile ;
AsciiOutput (vFile, 'Code run by: ' | TM1User () );

i = 1;
iMax = 65536;
WHILE ( i <= iMax);
AsciiOutput (vFile, NumberToString (Rand()) );
i = i + 1;
END;
Run this process.  It will now create sk3.txt.  Log out from architect and log back in with a different user.  Modify the file name to sk4.txt, save and run the process
vFile = 'sk4.txt';
Let's compare sk3.txt with sk4.txt
 The random numbers generated between the 2 users are exactly the same i.e., the unique times IBM Cognos TM1 can generate random numbers is 65,536 and it is system wide (irrespective of users).  If the TM1 service associated with the server is restarted, then the slate is wiped clean.